All these products you can buy at Sally's.
First use nail polish remover to clean your nails even if you have no nail polish on:
 |
| my nails are so short! i bite them :( fake nails help allot w/ this bad habit! |
Dry your nails very well! And if your nails are soft from the water I like to wait a while otherwise the filing and buffing can hurt (i have super thin nails):
I buy my nail tips from Sally's they cost about 6 dollars, i'm going to be using my white tips but i also really like the natural and clear tips:
Then you will also need a file, a buffer, nail glue and scissors or nail clippers:
Now buff all your nails so the glue and nail tip will stick better:
After buffing your whole nail, including tip it's time to measure the tip to fit the nail. Look at your nail and find where your nail bed ends and where the white part of your nail grows, you will glue the tip above this point. Too low and your natural nail growth will contrast to the tip:
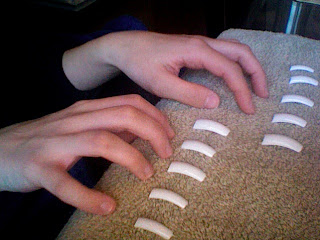
I like to lay out all of the tips so I don't get them confused and start with my whole left hand then do my right:
Buff underneath the tip so it adheres better to your nail, apply a drop glue to the bottom and press and hold down firmly into your nail:
Creepy long nails!
After trimming all your nails file all the edges. File the sided, the tip to whatever shaper and the top where the tip is glued to your nail and file it down until it blends evenly and isn't raised:
The nail on the left has been filed and you can tell it looks more cohesive to my nail then the other nail.
Buff your whole nail, natural and tip so the tip isn't shiny and all the rough edges from the filing are gone:
The gel and the gel spray you can also but at Sally's which both are like 9 dollars each and will last you a couple of months depending on if you break a nail and growth:
When applying the gel i do it 3 times, once just covering my natural nail, then just on the tip, then lightly over the whole nail:
Applying the gel just to the pink part of the nail
Spray the nail twice to cure it
gelled nail!
Apply gel to the tip, covering the whole tip in a thin layer. Applying the gel too thickly will make it run onto your skin and can adhere to it!
Spray twice! Each time you apply the gel spray twice. Working in smaller increments will insure no gel gets on the skin.
After all the gel is dried its all lumpy and bumpy but you file and buff that all away so no worries!
File the sides, around the cuticle, and the tip to create a smooth look like at the nail salon:
Then buff the whole top of the nail to smooth it out, lots and lots of buffing!
Buffed on the left vs. not buffed
After buffing the heck out of your nails wash them and dry them to get all the powder off and apply clear nail polish:
insta dry by Sally Hanson
Ta-Da!! DIY gel nails! So easy and cheap and no one will know!!!


OMG! love this post! I really want to try it!
ReplyDeleteit looks so professional!
but how do u remove them? :)xx
This comment has been removed by the author.
DeleteHi,
DeleteThis site is looking good.
And I appreciate with your blog.Great!!!
Thanking You.
Nail tip human hair extensions
This is such a nice colour, I'm definitely going to check out the makeup, I'm a big fan of their polishes already!
ReplyDeletenail supplies
Do you know the names of the products you used?
ReplyDeleteNice tips to whitening nails with professional way. I appreciate your work by offering a unique information in this regard. But I blame on using cosmetic products to the skin.Temporary Tattoos Melbourne
ReplyDelete